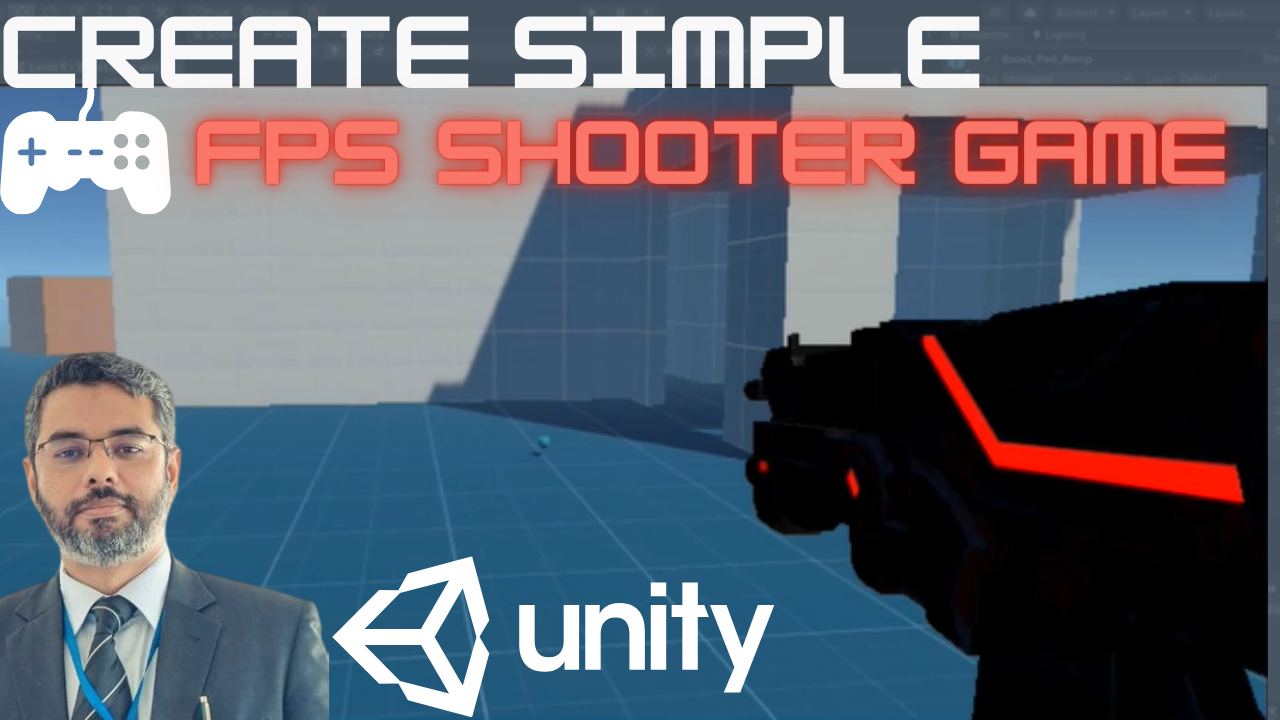
Learn how to create a simple FPS shooter game in Unity with this step-by-step tutorial. Add features like shooting, enemy AI, health systems, and reloading mechanics, complete with visual effects and sound. Perfect for beginners looking to make their first game!
Introduction:
Welcome to this exciting Unity tutorial, where we’ll guide you through the process of creating your very own FPS (First-Person Shooter) game! Whether you’re a beginner or looking to add new features to your Unity game, this tutorial covers everything from setting up your project to adding enemies, shooting mechanics, and more. By the end, you’ll have a fully functional FPS game that you can expand and customize however you like. Let’s dive in and start building your game in Unity!
Table of Content
- Step 1: Open Unity Hub and Click on New Project
- Step 2: Select the “First Person” Template
- Step 3: Create and Play the Project
- Step 4: Open the Asset Store and Find a Sci-Fi Gun
- Step 5: Download and Import the Gun Asset
- Step 6: Fix the Gun Materials
- Step 7: Add the Gun to the Player Camera
- Step 8: Configure Input for Shooting
- Step 9: Add Shooting Logic in Code
- Step 10: Attach a Gun Script
- Step 11: Test the Shooting Mechanism
- Step 12: Create a Bullet Object
- Step 13: Add Material and Physics to the Bullet
- Step 14: Prefab the Bullet
- Step 15: Add Bullet References in the Gun Script
- Step 16: Assign Bullet and Spawn Point in Unity
- Step 17: Update the Gun Script for Shooting
- Step 18: Test the Shooting with Bullets
- Step 19: Polish and Playtest
- Step 20: Adding Enemy AI
- Step 21: Implementing Shooting Damage
- Step 22: Enemy Health System
- Step 23: Adding Reload Mechanics
- Step 24: Adding Gun Effects (Muzzle Flash and Sound)
- Step 25: Final Touches
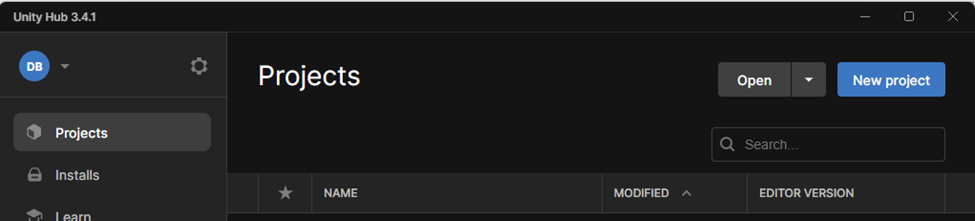
Step 1: Open Unity Hub and Click on New Project
Unity Hub is like the command center for all your Unity projects. If you haven’t already installed it, make sure you download Unity Hub from Unity’s official website. Once it’s up and running, open it, and you’ll see a big, inviting “New Project” button. Click on it to start fresh.
Why start with a new project? Starting fresh ensures a clean slate with no unwanted configurations or files. It’s like prepping your desk before a big project—you want everything neat and organized.
Clicking New Project takes you to the templates section, where Unity has prebuilt configurations for different types of games. This saves time and makes life easier for beginners.
Step 2: Select the “First Person” Template
In the New Project window, you’ll see a range of templates for different game genres—2D, 3D, URP, VR, etc. Scroll until you find the “First Person” template.
Here’s the fun part: Before you can use it, you’ll notice a little cloud icon next to it. This means you need to download the example project first. Click on the cloud icon, wait for it to download, and then the option will be ready to use.
Why use a template? Templates like First Person provide a prebuilt framework, including essential scripts, controllers, and camera settings. You don’t need to write everything from scratch—Unity does the heavy lifting. Once the download is complete, give your project a meaningful name (like “FPS_Tutorial”) and hit Create Project.

Step 3: Create and Play the Project
After Unity finishes setting up your project, you’ll land in the Unity Editor. Don’t let all the panels overwhelm you—it’s easier than it looks! Before doing anything else, hit the Play button (the triangle at the top of the editor).
What happens? You’ll notice a simple game environment where you can move, jump, and collide with walls. This is your starting point—a basic FPS setup.
This step is important because it lets you confirm that everything is working correctly out of the box. Plus, it’s always fun to see something functional right away. Play around and get a feel for the environment.
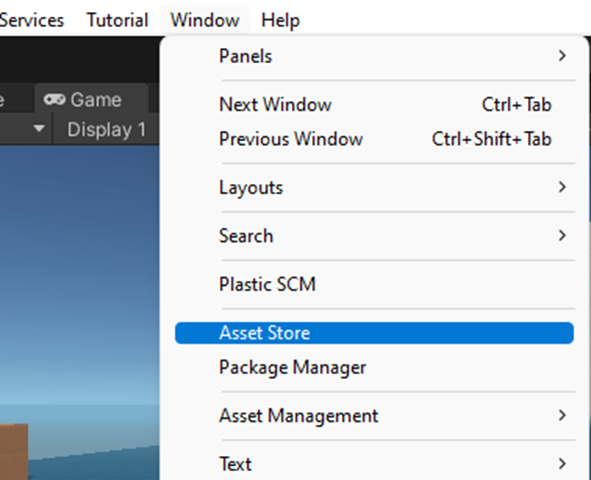
Step 4: Open the Asset Store and Find a Sci-Fi Gun
Now, let’s add some flair to our FPS game—a futuristic Sci-Fi gun. To access the Asset Store, go to Window > Asset Store in the Unity Editor.
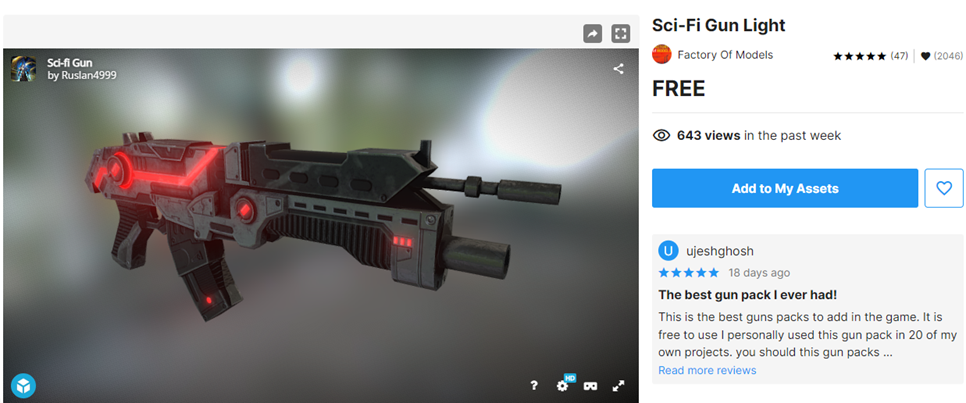
In the Asset Store, search for “Sci-Fi Gun Light”, or use the link provided in the tutorial:
https://assetstore.unity.com/packages/3d/props/guns/sci-fi-gun-light-87916.
Once you find the asset, click Add to My Assets. Why use a prebuilt asset? It saves you the trouble of modeling and texturing, which can be time-consuming. Plus, it ensures you’re using professional-quality 3D models.
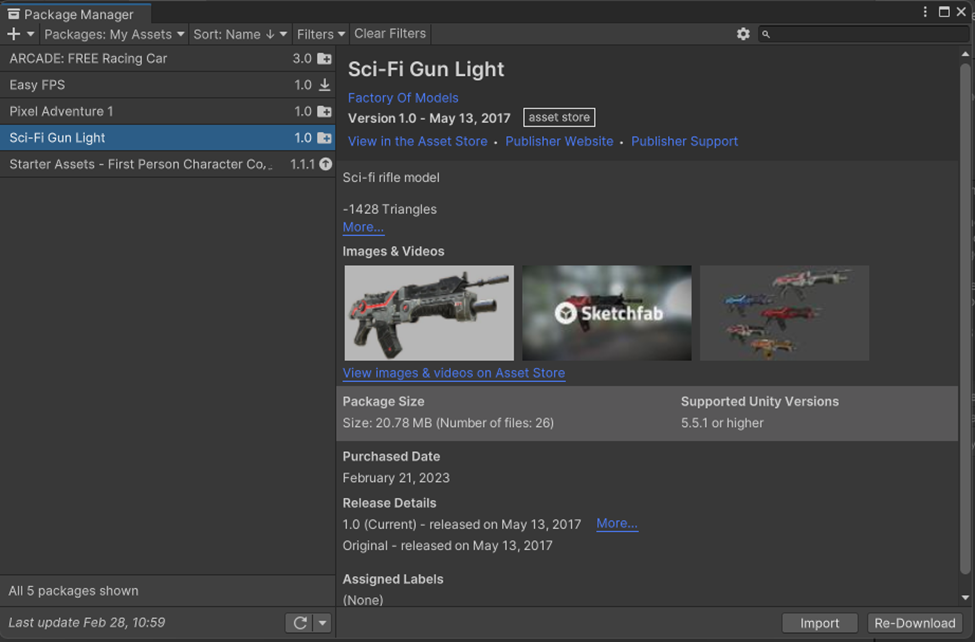
Step 5: Download and Import the Gun Asset
Now, let’s bring that Sci-Fi gun into our project. Go to Window > Package Manager in the Unity Editor. In the Package Manager, select My Assets, and you should see the gun you just added.
Click on the Download button and wait for it to finish. Once downloaded, the button changes to Import. Click Import to bring the gun into your Unity project.
This step is like opening a gift—you’re unpacking the cool stuff you’ll use in your game. Once imported, you’ll see the asset files under your Project window. They’re ready to be used!
Step 6: Fix the Gun Materials
Sometimes, imported assets don’t look quite right due to material or rendering issues. To fix this, go to the Project window, find the Materials folder inside the gun asset, and select all the materials.

Next, go to Edit > Rendering > Materials, and click on Convert Selection…. This updates the materials to match your project’s rendering pipeline.
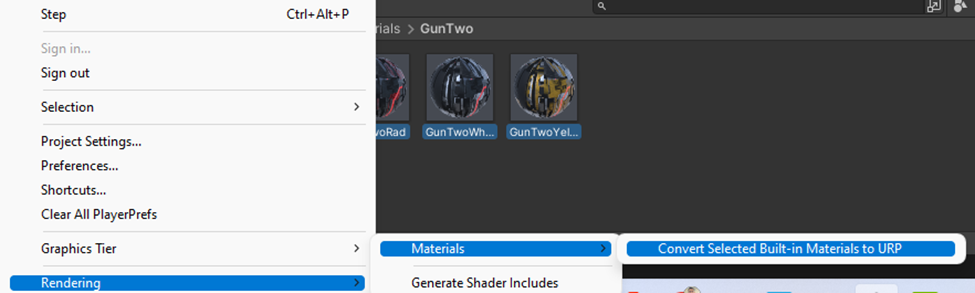
Why is this important? Correct materials ensure your gun looks as intended, with proper textures, lighting, and effects. It’s a quick fix that makes a big visual difference.
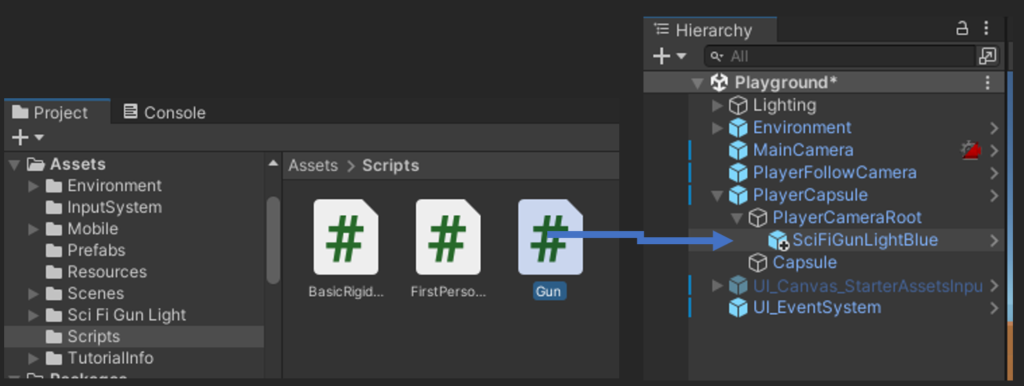
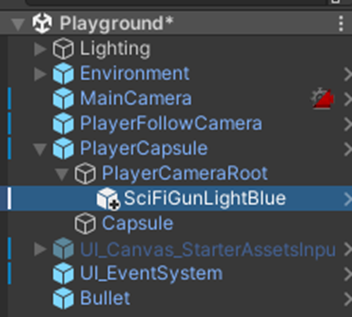
Step 7: Add the Gun to the Player Camera
Now it’s time to give your player a weapon! Go to the Prefabs folder inside the gun asset. Locate the prefab for the gun (e.g., “GunLight”) and drag it into the Hierarchy window. Drop it under the Player Camera.
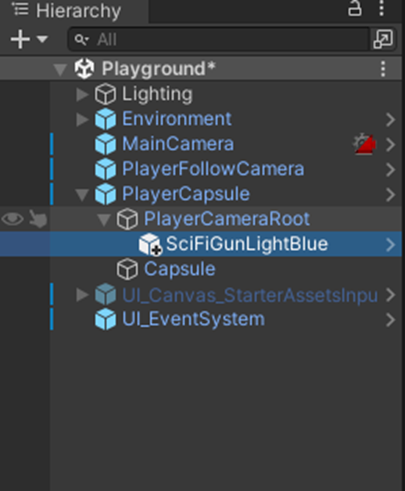
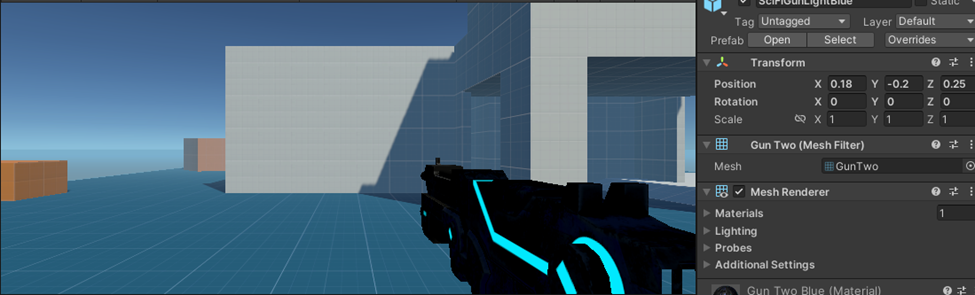
Next, select the gun in the Hierarchy and reset its transforms using the Inspector window. Then, adjust its position values manually to place it in front of the camera so it looks like the player is holding it.

This step ensures the gun follows the camera movements, creating an immersive first-person view.
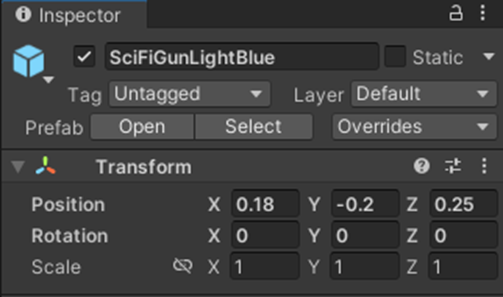
Now enter the following Position Values for the Gun to make it appear at correct location. Now play and test the gun position. Gun should move with camera.
Step 8: Configure Input for Shooting
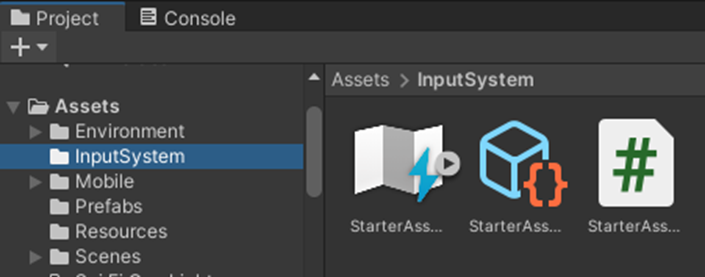
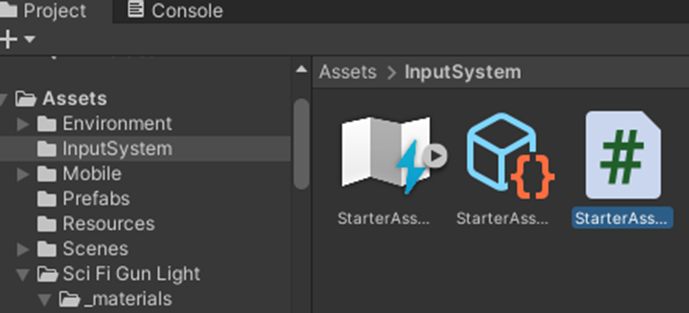
To make your gun functional, you’ll use Unity’s Input System. In the Project window, navigate to Input System > Starter Asset, and double-click on it.
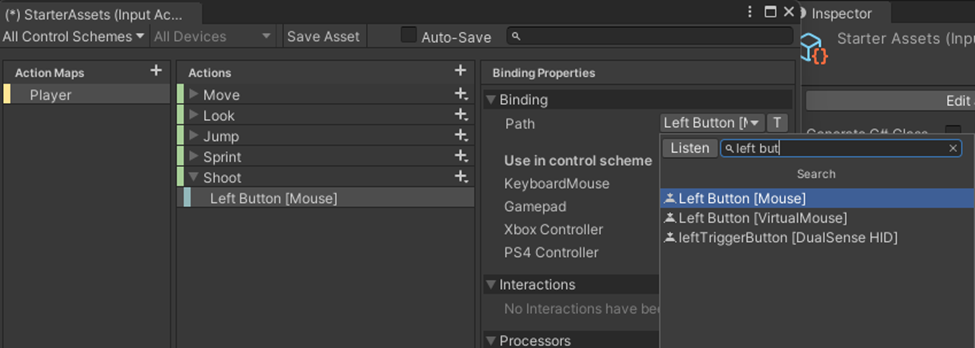
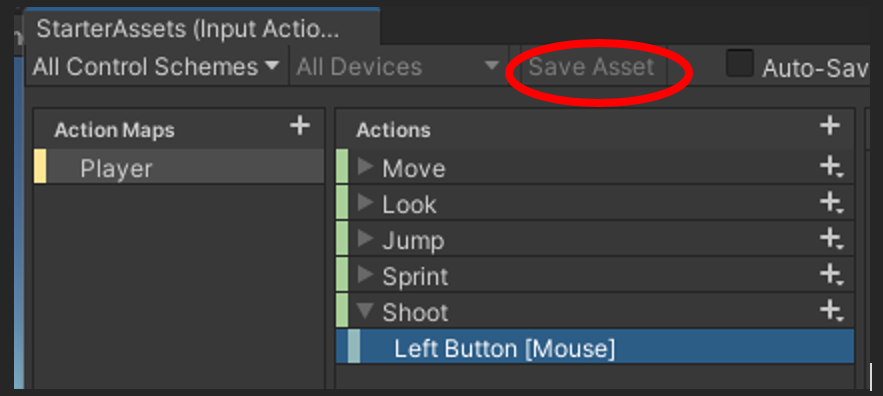
In the Starter Asset window, click the + icon to add a new action. Name the action “Shoot”. Select its binding, and under Path, search for “Left Button” (mouse click). Save your changes by clicking the Save Asset button.

Now make sure to click on Save Asset Button
Why this step? Input configurations allow players to interact with the game. Here, you’re linking the mouse click to the shoot action.
Step 9: Add Shooting Logic in Code
Now, let’s bring the shooting action to life with some scripting. Open the StarterAssetsInputs.cs script, and add this code under variable declarations:
Double click on Starter Script, and enter the code shown below.
public bool shoot;

// Add the SHOOT function
public void OnShoot(InputValue value){
    shoot = value.isPressed;
}
This code detects when the player clicks the left mouse button and stores the action in a variable. Save the script and return to Unity to test.
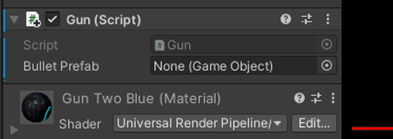
Step 10: Attach a Gun Script
Create a new script called Gun.cs in the Scripts folder. Drag this script onto the gun prefab in the Hierarchy.
Then, double-click the script to open it in your code editor. Add the following code to test the shooting functionality:
using System.Collections;
using System.Collections.Generic;
using UnityEngine;
using StarterAssets;

public class Gun : MonoBehaviour
{
    private StarterAssetsInputs _input;

    void Start()
    {
        _input = transform.root.GetComponent<StarterAssetsInputs>();
    }

    void Update()
    {
        if(_input.shoot){
            Shoot();
            _input.shoot = false;
        }
    }

    void Shoot(){
        Debug.Log("Shoot");
    }
}
This code listens for the shoot action and logs a message when the player fires.
Step 11: Test the Shooting Mechanism
Now it’s time to test your shooting logic. Run the game by hitting the Play button in the Unity Editor. Aim your camera around and click the left mouse button. If everything is working correctly, you should see the word “Shoot” appear in the Console window every time you fire.
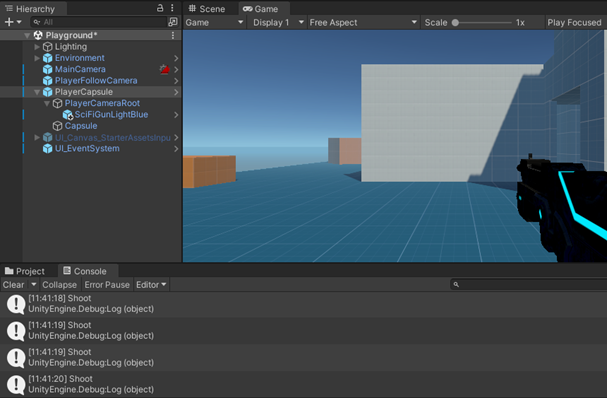
This is an exciting milestone! Why? It’s the first tangible feedback that your coding and setup are working together. If you don’t see the output, double-check your Gun.cs and StarterAssetsInputs.cs scripts for any errors. Don’t worry—debugging is part of the process.
Think of this step as laying the foundation for more complex gameplay mechanics. Once you’re happy with the functionality, move on to adding bullets!
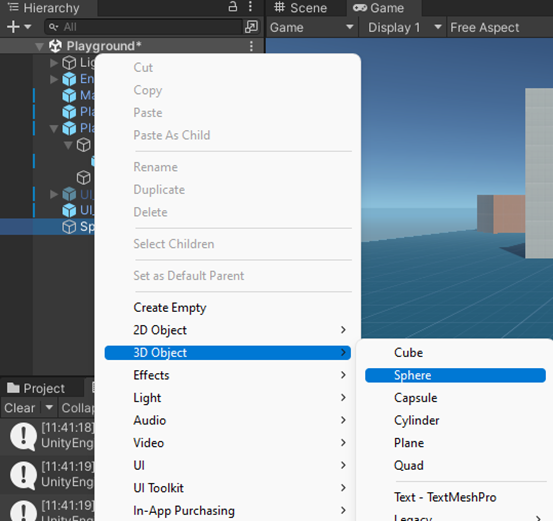
Step 12: Create a Bullet Object
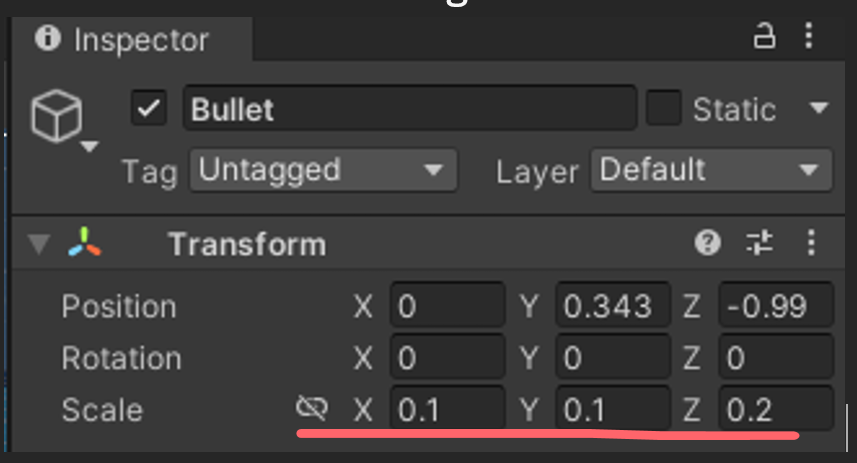
Now, let’s add some real action to the shooting. In the Hierarchy window, right-click and create a 3D Object > Sphere. This sphere will act as your bullet. Rename it to “Bullet” for clarity.
After renaming, reset the transform of the sphere to position it at the origin (0,0,0). You’ll find this option in the Inspector window under the Transform component. To make the bullet more realistic, adjust its Scale to something smaller, like 0.1, 0.1, 0.1.
Why use a sphere? A sphere is simple, visually distinct, and easy to manipulate. Plus, its rounded shape makes it a great placeholder for any kind of projectile.
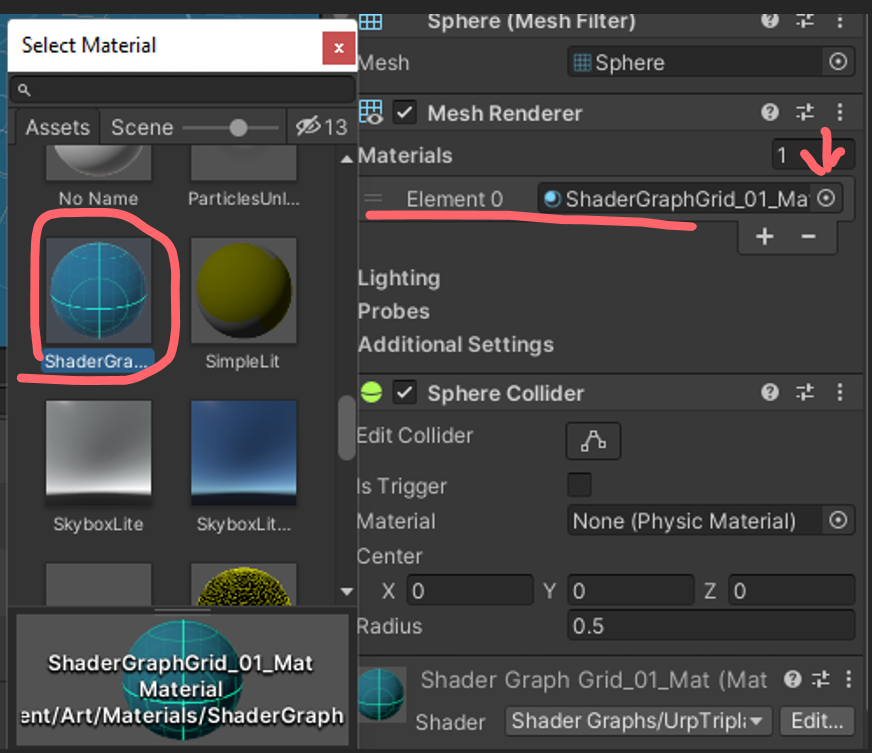
Step 13: Add Material and Physics to the Bullet
Bullets need to stand out! Assign a unique material to the bullet by selecting it, then navigating to the Inspector window. Click Add Component > Material, and choose or create a vibrant material color to make it pop in the game.
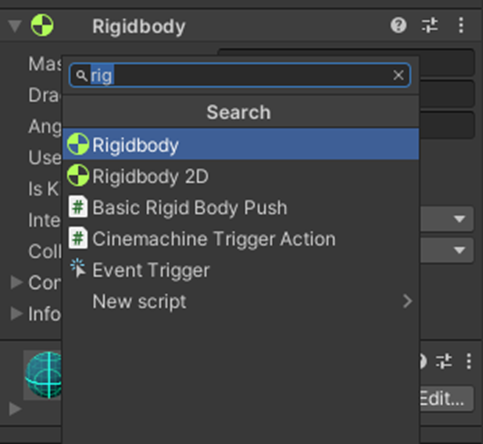
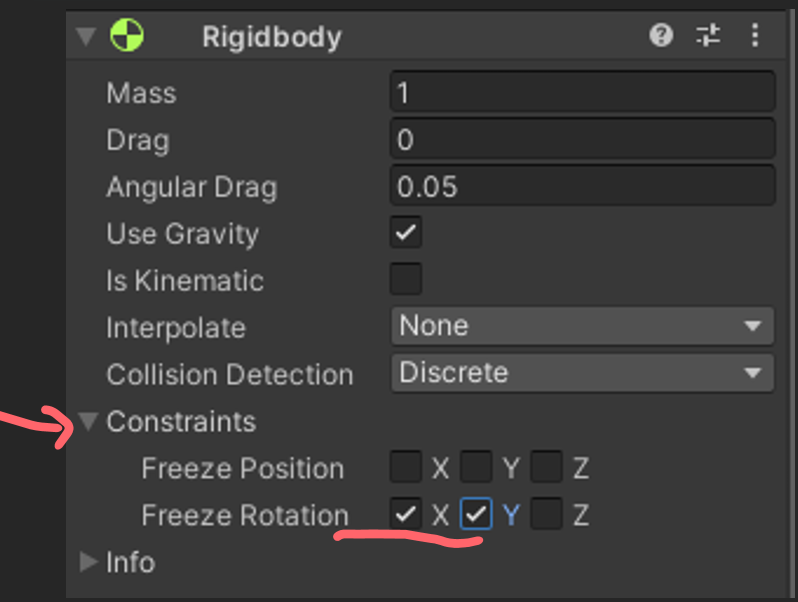
Next, give the bullet some physics. Add a Rigidbody component by clicking Add Component > Rigidbody. This enables the bullet to respond to gravity and forces. Under the Rigidbody settings, freeze the X and Y rotation in the Constraints section.
Why freeze the rotation? Without this, the bullet might spin awkwardly in midair, ruining the realism. With these settings, your bullet will behave more predictably in motion.
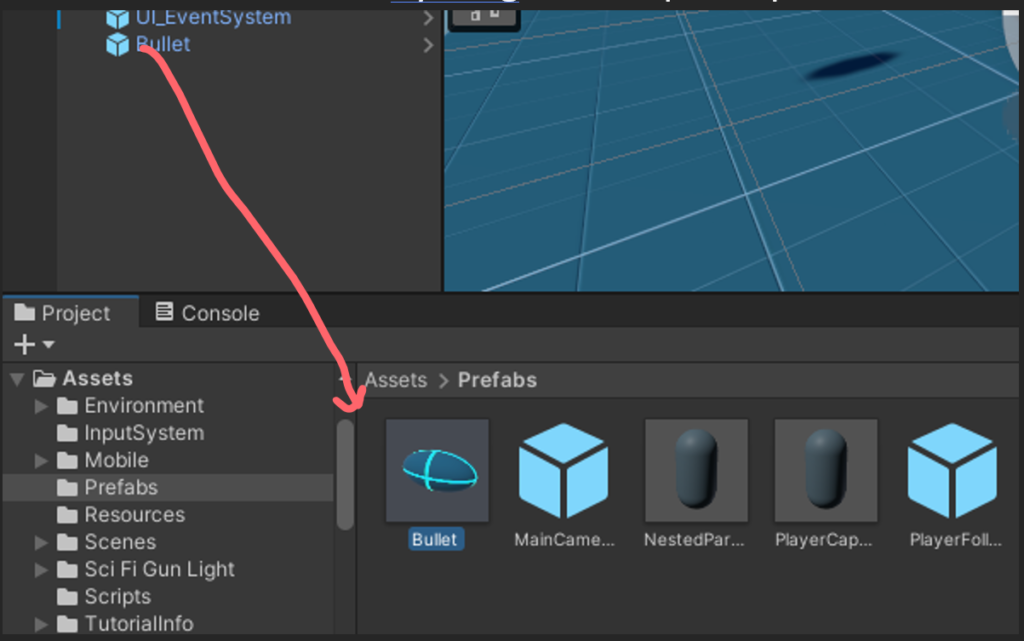
Step 14: Prefab the Bullet
Prefabbing makes your bullet reusable. In the Project window, navigate to the Prefabs folder. Drag and drop your bullet object from the Hierarchy into the Prefabs folder. This creates a prefab of your bullet, which you can instantiate whenever the player fires.
Why prefab? Prefabs are Unity’s way of creating a blueprint for objects. With this prefab, you can spawn identical copies of the bullet in the game without manually creating each one.
Once you’ve prefabbed the bullet, delete the original sphere from the Hierarchy to keep things tidy.
Step 15: Add Bullet References in the Gun Script
Now, let’s connect the bullet prefab to the gun. Open the Gun.cs script in your editor and add the following lines near the top of the class:
[SerializeField]
private GameObject bulletPrefab;

[SerializeField]
private Transform bulletPoint;

[SerializeField]
private float bulletSpeed = 600f;
Here’s what’s happening:
- bulletPrefab holds the prefab for the bullet.
- bulletPoint defines where the bullet will spawn (e.g., the muzzle of the gun).
- bulletSpeed lets you control how fast the bullet travels.
Save the script and return to Unity.
Step 16: Assign Bullet and Spawn Point in Unity
Select the Gun object in the Hierarchy. In the Inspector window, you’ll see the new fields you added: Bullet Prefab, Bullet Point, and Bullet Speed.
Drag the bullet prefab from the Project window into the Bullet Prefab field.

Next, create an empty game object under the gun, rename it “BulletPoint”, and position it at the muzzle of the gun. Finally, drag this BulletPoint object into the Bullet Point field.
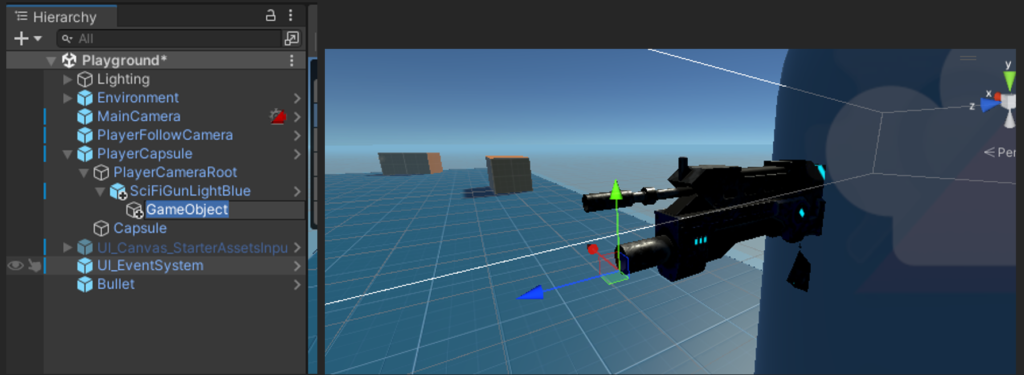
Why add a spawn point? The spawn point ensures bullets are fired from the correct position, aligned with the gun’s muzzle. This adds realism and precision to your shooting mechanics.
Goto to unity, and add the gameobject to script reference point. Select the SciFy gun, Drag and drop the BulletPoint object and drop it in Script BulletPoint parameter.

Step 17: Update the Gun Script for Shooting
Let’s complete the shooting functionality. Open the Gun.cs script and update the Shoot() method like this:
void Shoot() {
    Debug.Log("Shoot");
    GameObject bullet = Instantiate(bulletPrefab, bulletPoint.position, bulletPoint.rotation);
    bullet.GetComponent<Rigidbody>().AddForce(bulletPoint.forward * bulletSpeed);

//destroy bullet after 1 second

    Destroy(bullet, 1f); // Destroy bullet after 1 second
}
Here’s the breakdown:
- Instantiate() creates a new bullet at the spawn point.
- AddForce() propels the bullet forward with the defined speed.
- Destroy() ensures the bullet doesn’t clutter the game world after being fired.
Save the script and return to Unity.
Step 18: Test the Shooting with Bullets
Hit Play and try firing your gun. You should see bullets shooting out from the gun, flying forward at high speed, and disappearing after 1 second. Check the Console window to confirm that your code is running smoothly.
This step is super satisfying—it brings your shooting mechanic to life! If the bullets don’t appear or behave oddly, double-check your script and the bullet prefab settings. Debugging is part of the fun.
Step 19: Polish and Playtest
With the basic shooting mechanic complete, spend some time tweaking the bullet speed, spawn point alignment, and other settings. Playtest the game to ensure the gun feels responsive and accurate.
This step is all about refining the experience. A well-tuned mechanic can make your FPS game feel polished and professional. Congratulations—you’ve built the foundation for a first-person shooter in Unity!
Step 20: Adding Enemy AI
To make your FPS game engaging, let’s add some enemies! First, create an enemy model. You can use a Capsule as a placeholder:
- In the Hierarchy window, right-click and select 3D Object > Capsule. Rename it to Enemy.
- Position it in front of the player.
- Assign a distinct material to the enemy for easy identification.
Next, we’ll add simple movement logic to the enemy. Create a new script named EnemyAI.cs and attach it to the Enemy object.
Here’s the basic enemy script:
using UnityEngine;

public class EnemyAI : MonoBehaviour {
    public Transform player;
    public float speed = 2f;

    void Update() {
        Vector3 direction = (player.position - transform.position).normalized;
        transform.position += direction * speed * Time.deltaTime;
    }
}
Explanation:
- The enemy constantly moves toward the player by calculating the direction vector.
- The speed variable controls how fast the enemy moves.
- Time.deltaTime ensures smooth movement regardless of frame rate.
In Unity, drag the Player Capsule onto the Player field in the Inspector to link the enemy to the player.
Step 21: Implementing Shooting Damage
Now, let’s make your bullets affect enemies. Update the Gun.cs script to detect collisions. Edit the Shoot() method like this:
void Shoot() {
    GameObject bullet = Instantiate(bulletPrefab, bulletPoint.position, bulletPoint.rotation);
    Rigidbody rb = bullet.GetComponent<Rigidbody>();
    rb.AddForce(bulletPoint.forward * bulletSpeed);

    // Add a collider and logic for bullet interaction
    bullet.AddComponent<Bullet>().InitializeBullet(1);
    Destroy(bullet, 1f);
}
Create a new script called Bullet.cs and add this code:
using UnityEngine;

public class Bullet : MonoBehaviour {
    private int damage;

    public void InitializeBullet(int damageAmount) {
        damage = damageAmount;
    }

    void OnCollisionEnter(Collision collision) {
        if (collision.gameObject.CompareTag("Enemy")) {
            collision.gameObject.GetComponent<EnemyHealth>()?.TakeDamage(damage);
            Destroy(gameObject);
        }
    }
}
Step 22: Enemy Health System
Create a new script called EnemyHealth.cs and attach it to your enemy object:
using UnityEngine;

public class EnemyHealth : MonoBehaviour {
    public int health = 3;

    public void TakeDamage(int damage) {
        health -= damage;
        if (health <= 0) {
            Destroy(gameObject);
        }
    }
}
Explanation:
- health tracks how many hits the enemy can take before being destroyed.
- The TakeDamage() method reduces health and destroys the enemy when it hits 0.
Don’t forget to tag the enemy as “Enemy” in the Unity Editor!
Step 23: Adding Reload Mechanics
To make the shooting mechanic realistic, let’s add ammo and reloading. Modify the Gun.cs script to include ammo management:
[SerializeField]
private int maxAmmo = 10;
private int currentAmmo;
[SerializeField]
private float reloadTime = 2f;
private bool isReloading = false;

void Start() {
    currentAmmo = maxAmmo;
}

void Update() {
    if (isReloading) return;

    if (currentAmmo <= 0) {
        StartCoroutine(Reload());
        return;
    }

    if (_input.shoot) {
        Shoot();
    }
}

IEnumerator Reload() {
    isReloading = true;
    Debug.Log("Reloading...");
    yield return new WaitForSeconds(reloadTime);
    currentAmmo = maxAmmo;
    isReloading = false;
}

void Shoot() {
    if (currentAmmo <= 0) return;

    currentAmmo--;
    GameObject bullet = Instantiate(bulletPrefab, bulletPoint.position, bulletPoint.rotation);
    Rigidbody rb = bullet.GetComponent<Rigidbody>();
    rb.AddForce(bulletPoint.forward * bulletSpeed);
    Destroy(bullet, 1f);
}
Step 24: Adding Gun Effects (Muzzle Flash and Sound)
To enhance visual and auditory feedback, add effects when the gun fires.
- Create a Particle System for muzzle flash:
- Right-click the gun in the Hierarchy and select Effects > Particle System.
- Adjust the size, speed, and emission to create a burst effect.
- Rename it MuzzleFlash and disable the GameObject by default.
- Add an audio source to the gun:
- Select the gun in the Hierarchy.
- In the Inspector, click Add Component > Audio Source.
- Assign a shooting sound clip.
Update the Shoot() method:
[SerializeField]
private ParticleSystem muzzleFlash;
[SerializeField]
private AudioSource gunShotSound;

void Shoot() {
    if (currentAmmo <= 0) return;

    currentAmmo--;
    muzzleFlash.Play();
    gunShotSound.Play();

    GameObject bullet = Instantiate(bulletPrefab, bulletPoint.position, bulletPoint.rotation);
    Rigidbody rb = bullet.GetComponent<Rigidbody>();
    rb.AddForce(bulletPoint.forward * bulletSpeed);
    Destroy(bullet, 1f);
}
Step 25: Final Touches
Playtest the game thoroughly:
- Check enemy AI, bullet collisions, and shooting mechanics.
- Fine-tune variables like speed, damage, and ammo count for balance.
- Adjust visual effects for impact.
You’ve now built a fully functional FPS shooter with enemies, reload mechanics, and immersive effects. Congratulations! Would you like to explore adding a score system, health packs, or level design next?