Welcome to this in-depth guide designed to transform your Visual Studio Code (VS Code) installation into a powerful, efficient, and modern C# development powerhouse.
If you are a beginner taking your first steps into the world of C# and the .NET ecosystem, or an experienced developer looking for a streamlined, lightweight alternative to the full Visual Studio IDE, this tutorial is for you. We will walk through every necessary component, from the core SDK to the essential VS Code extensions, ensuring your setup is robust and ready for production-level development.
To install C# in VS code you need to follow 5 main steps, to download .net SDK, and VSCode extensions.
Table of Contents
- Why Choose C# and VS Code?
- Part I: Laying the Foundation – The .NET SDK
- Part II: Setting Up the VS Code Environment
- Install C# in VSCode Extensions
- Check installation
- Part III: Creating and Executing Your First C# Project
- Step 7: Run C# Code in VS Code
- Part IV: Troubleshooting Common C# Setup Issues
- Conclusion: Next Steps in Your C# Journey
Why Choose C# and VS Code?
The combination of C# and VS Code represents a modern, cross-platform approach to software development.
- C# and .NET: Developed by Microsoft, C# is one of the most popular and versatile programming languages globally, powering everything from Windows desktop applications and high-performance backend services (ASP.NET Core) to game development (Unity) and mobile apps (Xamarin/MAUI). The underlying .NET platform is a powerful, unified, and open-source framework that ensures your C# code can run seamlessly across Windows, macOS, and Linux.
- Visual Studio Code (VS Code): This is not a full IDE but a highly customizable, lightweight source code editor. Its power comes from its vibrant extension marketplace. For developers, VS Code offers blazing-fast startup times, low resource consumption, and a user experience tailored for modern, multi-language projects. It is the perfect companion for cross-platform .NET development.
Part I: Laying the Foundation – The .NET SDK
Before we even touch VS Code, we must install the engine that allows C# code to compile and run: the .NET Software Development Kit (SDK).
Understanding the .NET SDK: The Core Engine
The .NET SDK is a bundle of tools, libraries, and runtime components required to build, test, and run .NET applications. It includes the C# compiler, the dotnet command-line interface (CLI) tool, and templates for creating new projects. Installing the SDK is the most critical first step.
Step 1: Downloading and Installing the .NET SDK
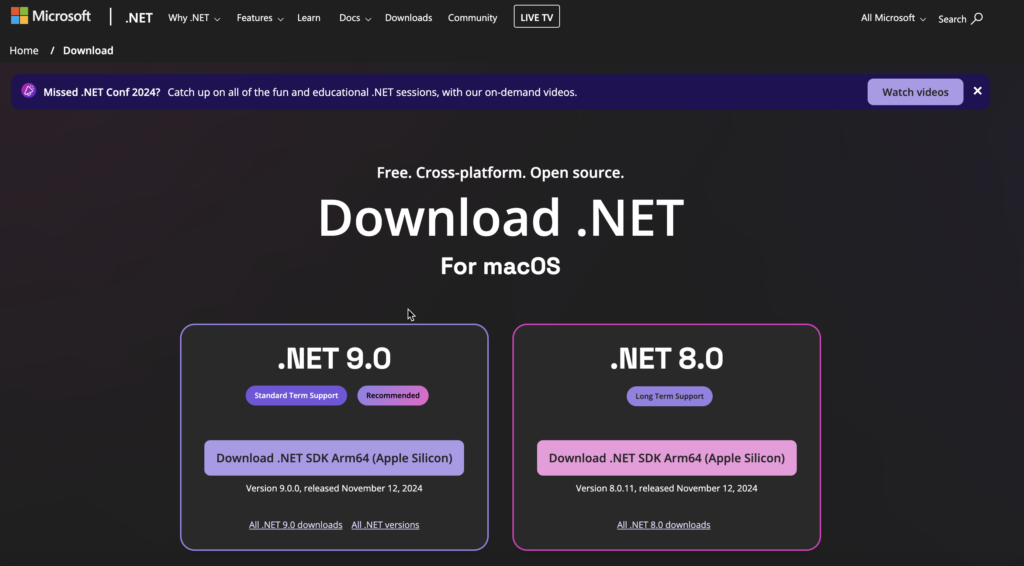
The .NET platform offers different releases, typically categorized as Long-Term Support (LTS) and Standard Term Support (STS), or “Current.” For most commercial and stability-focused projects, LTS is recommended, but for educational purposes or using the latest features, the “Current” version is acceptable.
Go to the official .NET website: https://dotnet.microsoft.com/en-us/download
- Select Your OS and Version: The website typically auto-detects your operating system (Windows, macOS, or various Linux distributions). Click on the link for the latest recommended .NET SDK.
- Download the Installer: This will download an executable file (e.g.,
.exefor Windows,.pkgfor macOS, or instructions for a package manager likeaptoryumfor Linux). - Run the Installation:
- Windows/macOS: Run the downloaded installer. The process is straightforward, requiring you to accept the license agreement and click through the default prompts. It’s crucial to ensure that the installer is allowed to modify your system’s environment path.
- Linux: Follow the specific instructions provided on the Microsoft site for your distribution (e.g., Ubuntu, Fedora). This usually involves adding the Microsoft package repository and using a command-line tool for installation.
Step 2: Verifying the SDK Installation (dotnet --version)
After installation, it is absolutely essential to verify that the dotnet command-line tool is accessible from your system’s command prompt or terminal. This confirms that the installation was successful and the necessary system PATH variables were correctly configured.
- Open a New Terminal/Command Prompt: Close and re-open your terminal (Command Prompt, PowerShell, or Terminal on Mac/Linux) to ensure it picks up the new PATH variables.
- Execute the Verification Command: Type the following command and press Enter:
dotnet --version3. Expected Output: If successful, the terminal will display the version number of the installed .NET SDK (e.g., 8.0.100). If you receive an error like “command not found” or “dotnet is not recognized as an internal or external command,” it means the PATH variable was not set correctly. You may need to manually add the .NET installation directory to your system’s PATH environment variables.
Part II: Setting Up the VS Code Environment
With the .NET SDK installed, we now turn our attention to the code editor itself.
Step 3: Downloading and Installing Visual Studio Code
- Visual Studio Code (VS Code) is a free, powerful, and light-weight code editor developed by Microsoft.
- Download VS Code: Navigate to the official download page: https://code.visualstudio.com/download
- Run the Installer: Choose the installer for your operating system. During the installation process on Windows, ensure you check the options to “Add ‘Open with Code’ action to Windows Explorer directory context menu” and “Register Code as an editor for supported file types.” These checkboxes greatly improve workflow efficiency.
- Launch VS Code: Once installed, launch the application.to download and install VS Code
Download Visual Studio Code – Mac, Linux, Windows

Step 4: Essential VS Code Extensions for C# Development
VS Code’s C# capabilities are not built-in but are provided via extensions. You need to install the core packages developed by Microsoft to enable debugging, IntelliSense (code completion), and project management.
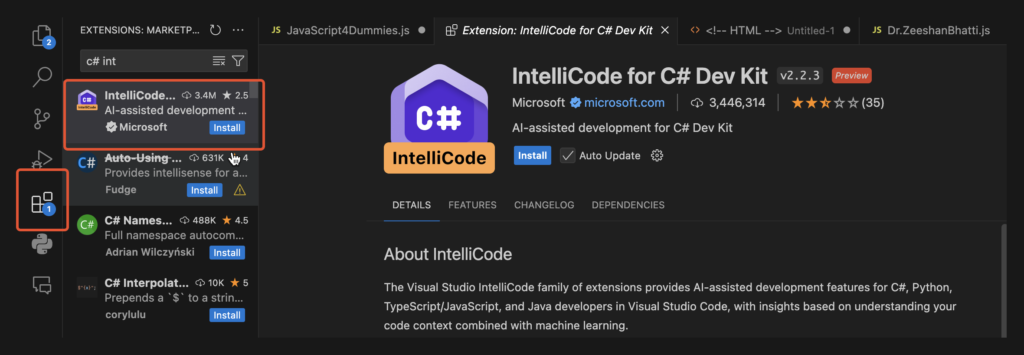
- Open the Extensions View: Click on the Extensions icon (a square stack) in the Activity Bar on the far left, or press
Ctrl+Shift+X(orCmd+Shift+Xon Mac). - Search and Install the Core Development Kit:
Install C# in VSCode Extensions
In order to Run C# in VSCode you need to install two main extension to enable .net projects and C# code inside VSCode.
Goto Extensions tab in VS code and search for following two extensions and click install
A. C# Dev Kit (Crucial for Modern Development)
Search for: C# Dev Kit
Developer: Microsoft
Purpose: This is the primary, all-in-one extension recommended for C# development. It bundles several crucial components, including a powerful Roslyn-powered Language Service, specialized project explorers, and integrated testing tools. It offers a premium development experience within the lightweight VS Code environment.
Action: Click Install. Installing this one extension often pulls in other necessary dependencies, such as the basic C# extension.

B. IntelliCode for C# Dev Kit
Search for: C# IntelliCode
Developer: Microsoft
Purpose: This extension uses artificial intelligence to provide smarter, context-aware code completions and suggestions. Instead of generic alphabetical lists, it promotes suggestions based on common usage patterns and your current code context, leading to faster, more accurate coding.
Action: Click Install.
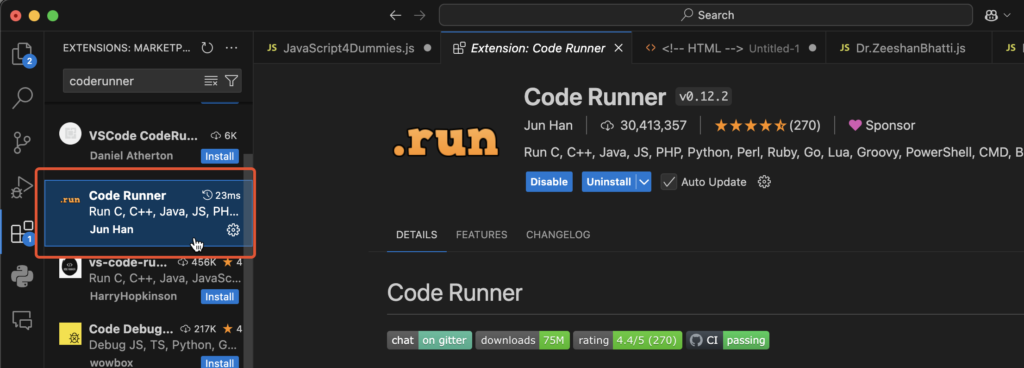
C. Code Runner (The Convenience Factor – Optional but Handy)
A bonus tip! also search and install VS Code extension called “Code Runner”. This is a very handy extension, that allows us to run code directly by clicking the Run Button.
Search for: Code Runner
Developer: Jun Han
Purpose: While not essential for .NET project development, this utility extension provides a quick Run ▶️ Button in the top right corner. It allows you to instantly compile and run single C# files or console applications without having to manually type dotnet run in the terminal every time, which is particularly useful for beginners testing small code snippets.
Action: Click Install.
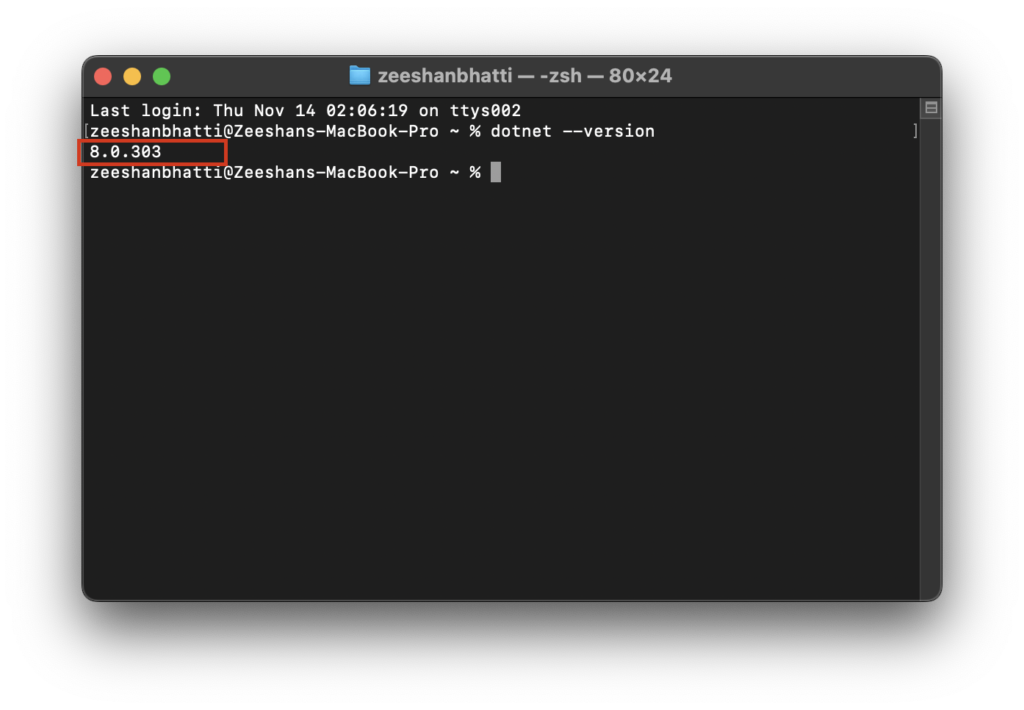
Check installation
Open Command prompt or Terminal and type the following command to check if the .net SDK is properly installed and running.
dotnet --versionOnce you run the command, you should see the .net sdk version number as bellow.
Part III: Creating and Executing Your First C# Project
Now that the foundation is laid (SDK) and the tools are installed (VS Code + Extensions), let’s create the classic “Hello World” application.
First, you need to create an empty folder on your drive and open that folder inside VSCode. Goto File, click open folder and select your project folder.
Step 5: Initializing a New C# Console Project
We will cover two methods for project creation: the user-friendly VS Code Command Palette (GUI method) and the industry-standard Command Line Interface (CLI method).
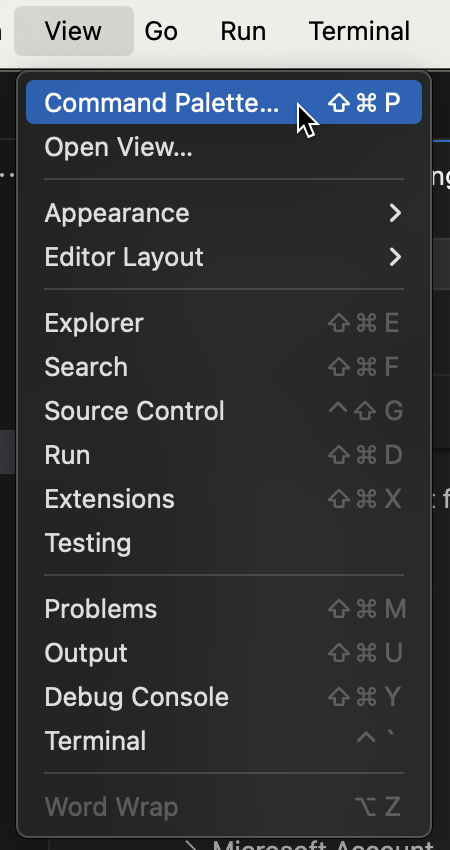
- Now, Goto the View Menu and select “Command Palette…” option from it.
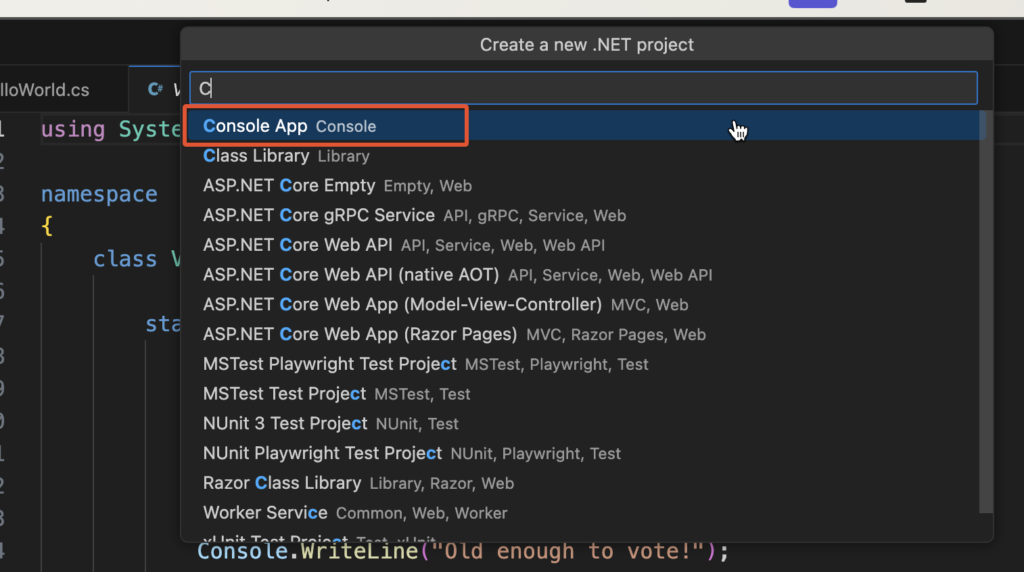
2. Now in Palette type “.net: new Project” and select the new project window.

3. As soon as you select the “.net New Project” option, a new option panel would appear. Type Console and Select “Console App” from this Option
4. After this a new pallete would apear, asking to enter the Name of the New Project. Type Your Project Name here and Press Enter.

5. Once you provide the project, now select the folder to save the project, which in our case will be the “Default directory” and press ENTER

6. Finally it again going to confirm to “Create Project”, select this option and press ENTER
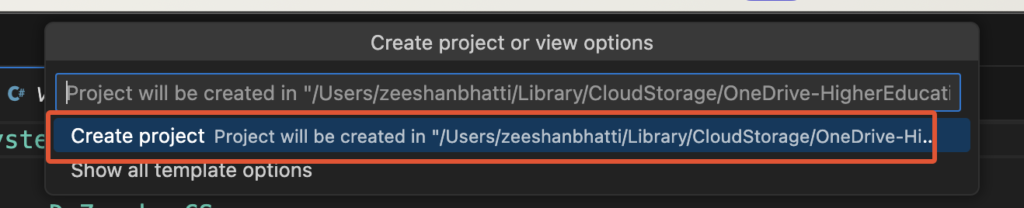
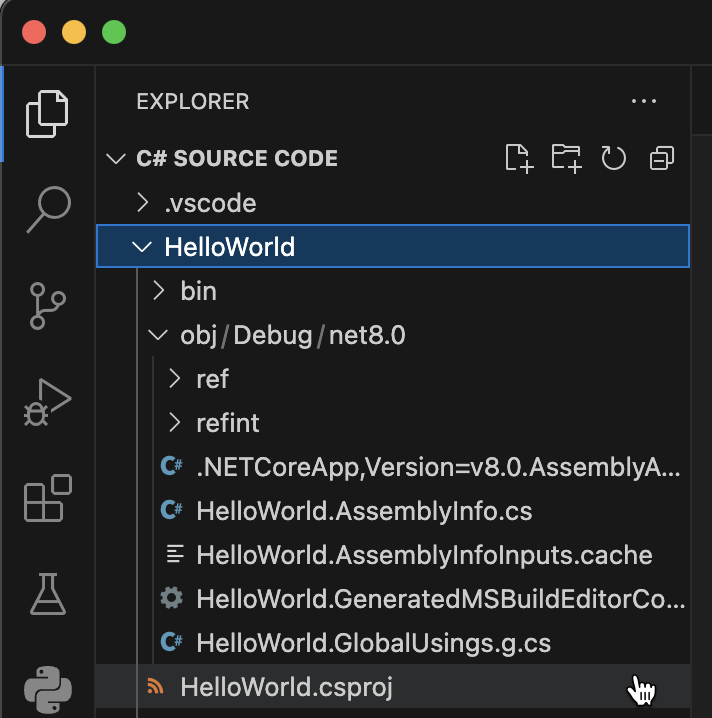
All DONE. Now you will notice that VS Code has create the New Project and all necessary library files are automatically added to your project folder.
Step 7: Run C# Code in VS Code
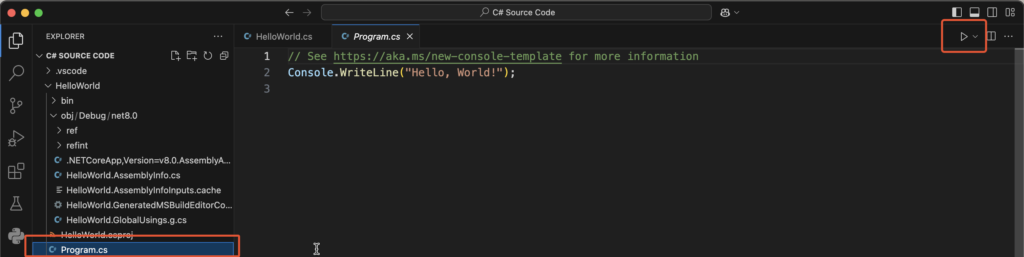
The project is created; now let’s run the code! To run C# code, locate and open the “program.cs” file in the root of yoru newly created project director in VS Code Explorer.
Then Click on the Run ▶️ Button on the top right corner the vscode as shown.
Now in Terminal Window type the following command to run the Project
dotnet run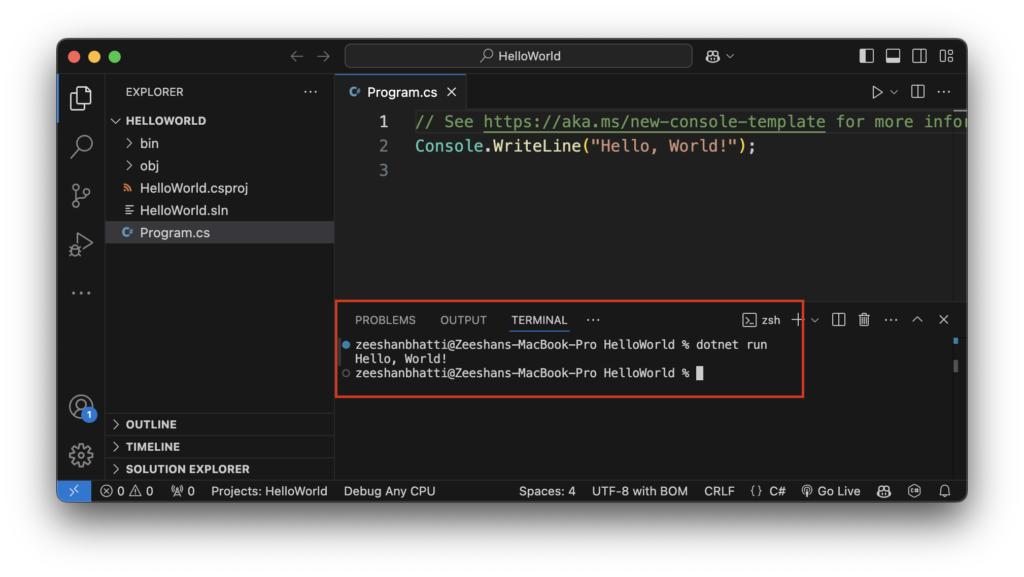
Using the Code Runner Extension
If you installed Code Runner, you can:
- Click the Run Button: Click the small Run ▶️ Button located in the top-right corner of the VS Code editor window.
- Verify Output: The output will be displayed in the VS Code OUTPUT panel (not the Terminal panel).
CONGRATULATIONS! You have successfully installed and Run C# .net SDK in VS Code.
HAPPY Coding.
Part IV: Troubleshooting Common C# Setup Issues
Even with careful installation, developers often encounter a few common hurdles. Addressing these proactively adds immense value to your tutorial.
Issue 1: dotnet Command Not Found
Symptom: When you run dotnet --version, the system reports the command is not recognized. Cause: The .NET SDK’s directory was not correctly added to the system’s Environment Variables (PATH). Solution:
- Locate the .NET Installation: Find the directory where the
dotnetexecutable is stored (e.g.,C:\Program Files\dotnet). - Manually Update PATH: Open your system’s environment variables settings and manually add the folder path from step 1 to the system or user PATH variable.
- Restart Terminal: Close and reopen all terminal windows for the change to take effect.
Issue 2: VS Code C# Features (IntelliSense/Debugging) Not Working
Symptom: You have code in your Program.cs, but there is no color syntax highlighting, auto-completion, or debugging features. Cause: The C# Dev Kit extension failed to install or activate correctly, or it cannot locate the installed .NET SDK. Solution:
- Check Extensions: Go back to the Extensions view and confirm that C# Dev Kit is installed and enabled.
- VS Code Restart: Sometimes a simple restart of VS Code is all that is needed for the extensions to load properly.
- Delete and Re-create Project: If the problem persists, delete the project folder and re-run the
dotnet new consolecommand via the terminal. The extensions often trigger necessary initialization processes when a new project is detected.
Issue 3: Project Build Errors (dotnet restore)
Symptom: The terminal shows errors related to missing packages or references, often mentioning a failure to download necessary libraries. Cause: This usually occurs if the initial package restore process failed due to network connectivity issues or a corrupted local package cache. Solution:
- Manually Restore Packages: Open your project’s directory in the terminal and run the following command:Bash
dotnet restore - This command forces the .NET CLI to download all required NuGet packages listed in your
.csprojfile. Once packages are restored, you can trydotnet runagain.
Conclusion: Next Steps in Your C# Journey
Congratulations! You have successfully established a highly professional, fully functional, and modern C# development environment using the powerful combination of the .NET SDK and Visual Studio Code.
By meticulously following these expanded steps, you have ensured that your setup is not only operational but also optimized with the latest tools and best practices. More importantly, by providing this level of comprehensive detail on your blog, you have turned a “thin content” guide into a substantial, authoritative resource.
Where to Go From Here: Expanding Your Knowledge
Your C# journey is just beginning. Now that you can successfully compile and run code, consider exploring the following advanced topics and frameworks within the .NET ecosystem:
- ASP.NET Core: The framework for building web applications, APIs, and microservices.
- WPF/MAUI: For developing rich desktop and cross-platform mobile applications.
- Entity Framework Core (EF Core): The Microsoft-recommended Object-Relational Mapper (ORM) for interacting with databases using C# objects.
- Unit Testing: Utilizing frameworks like xUnit or NUnit, which are integrated into the
dotnetCLI, to ensure your code is reliable and maintainable.